X10 Wall Switch Programming Instructions
 I keep forgetting how to program the stick-on wireless light switch control pad with rocker switches and a dimmer switch near the front door that controls our main light in the living room. So I'm posting the plain text instructions here, because I hate having to download them as PDFs and remember the exact name for the switch pad. Maybe this will help someone else as well. These instructions should apply to the plain version and the version that has the gold trim as well.
Stick-A-Switch™ (Model SS13A) Installation and operating instructions
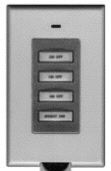
The SS13A works with the RR501 (part of the RC5000) and the TM751 (part of the RC6500). It lets you turn on and off three individually coded X10 Modules and brighten and dim lights connected to Lamp Modules and Wall Switch Modules. In the default state (after first fitting the battery) the SS13A is set to Housecode A. The top three ON-OFF rocker keys control modules set to Unit Codes 1, 2, 3.
The bottom rocker key brightens and dims lights connected to Lamp and Wall Switch Modules.
- Plug in an X10 Transceiver (RR501 or TM751, sold separately).
- To turn on or off X10 Modules set to Unit Codes 1, 2, or 3 (on Housecode A) press the left or right side of the first, second or third rocker key. To brighten or dim Lamp Modules or Wall Switch Modules press the number button first, then press and hold the left or right side of the bottom rocker key. Attach the SS13A to a wall using double sided tape or Velcro.™ If you want to control Modules 1, 2 and 3 on Housecode A, that's it. You don't need to read any further.
To change the Housecode
- Press and hold the first (top) ON rocker key. The red LED blinks once. 3 seconds later, the LED blinks the current setting: 1 blink for Housecode A, 2 blinks for B..... 16 blinks for P.
- Release the first (top) ON rocker key.
- Press and release the first (top) ON rocker key the appropriate number of times for the House Code you want to set. Once for A, twice for B, etc. The LED blinks for each press. IMPORTANT: Hold the button on your last press. 3 seconds later, the red LED blinks back the new setting, e.g. 3 blinks for Housecode C. If you do not follow this programming sequence, the LED will stay on for 1 second and your existing setting will not be changed.
To change the Unit Code
You can set the Unit Code for the first (top) rocker key. The second and third rockers are always one # higher than the first, i.e. if you set the first rocker key to 6, the second rocker key controls 7, and the third control 8, etc..
- Press and hold the top OFF rocker key . The red LED blinks once. 3 seconds later, the LED blinks the current setting: 1 blink for Unit Code 1, 2 blinks for 2, 16 blinks for 16.
- Release the top OFF rocker key.
- Press and release the top OFF rocker key the appropriate number of times for the Unit Code you want. IMPORTANT: Hold the key on your last press. 3 seconds later the new code blinks back. If you do not follow this programming sequence, the LED will stay on for 1 second and your existing setting will not be changed.
To change battery:
Open battery holder and fit a CR2032 Lithium 3V battery. Observe polarity.
[ Read and write comments ]